Writing a Family History When You Don’t Have All the Facts


Probably the most commonly asked question throughout my online classes, speaking engagements, and workshops are how do I write my family history when I don’t have all the facts?

What do I do when I don’t have enough family history research?

What do I do if I’ve never met them; I don’t even have a picture of them?

How do I write their stories when my research just isn’t enough?

In my early days of writing my family history stories I wondered this myself. The answer is simple, and yet at the same time complicated; by placing your ancestor within the historical context of the time.

What does it mean to place your ancestor in historical context?

Historical context uses historical knowledge of people, events, trends, and cultures to shed some light on your ancestor. To get to know them on a more intimate level, to understand their actions and reactions to events in their life.  When we take both the intimidate knowledge of our ancestors that we have acquired through our research and the understanding of the times in which they lived, we can interpret them and their actions. We can close in on those missing pieces of our stories.

It was a book called Bringing Your Family History to Life through Social History by Katherine Scott Sturdevant that helped me to understand historical context on a deeper level.

The simple statement in Katherine’s book brought it home for me. “Social history is the study of ordinary people’s everyday lives. ”

It all starts with your research, the documents, pictures, and artefacts you have acquired over the years. You’re ready to shape that story, but there are some holes, somethings you just don’t know enough about your ancestor that you feel is necessary to write their story. You then must turn to understanding the social history of your ancestor’s life. Even if there are no holes in your research, social history can give you a greater depth of knowledge of their life and decisions.

When we study social history, we place our ancestors in groups and understand and learn how these groups behaved.  We can then begin to fill in some of those behaviours and thought patterns of our ancestors. When we place our ancestors into social groups based on their culture, religion, age, sex, social status (the list is plentiful), we begin to fill in the missing pieces. We start understanding our ancestor on a deeper level, have knowledge of their actions and reactions and the influences that shaped their decisions. We get inside their head.

As an example, if I wanted to write the story of my three times great-grandfather, I need to understand the social history of his day. What was life like for an Irish man in Kilkenny in 1820’s? What was it like to be a Catholic at that time? To be a peasant farmer? To be an immigrant during that period?  How did he cope as an early settler in the rugged unchartered land known as Upper Canada?  When I study these groups, I can help to understand what my ancestor experienced, put him in those experiences and ultimately understand his actions and reactions.  Social history can help me to shed some light on who my ancestor was, on how and why he made the decisions that he made.

When we understand the historical context of our ancestor’s time, we can make some inferences about their lives.

An inference is an art of drawing from evidence to recognise the relevant results of something. It is the act of drawing conclusions based on a premise and accumulated facts. It is speculation. Genealogists speculate all the time. We draw assumptions based on what we suspect might be true scenarios based on the research we have acquired.  An inference is the same. We can speculate on our ancestor’s lives not only based on our research but in addition to the historical and social history influences of the day.

By researching social history, the study of ordinary, similar people to your ancestors, and blending that information with the specific research of your ancestors you can paint a fuller story of your ancestor’s life.

Your inference is then based on solid social history research that you can in fact source and cite.

You will also state your conclusions directly never implying them and misleading the reader. When you write a statement of fact, you have a document that backs up your claim. If you do not then, you need to reword what you’ve written and make it clear that you are inferring or speculating.

 Using Tag Words

You can use tag words such as ‘almost certainly,’ ‘probably,’ or ‘perhaps’ to indicate that you are speculating and to not mislead the reader.

In the article “Perhapsing”: The Use of Speculation in Creative Nonfiction, author Lisa Knopp explains,

In order to write the essay, Kingston needed a deeper, fuller understanding of her aunt’s life and a clearer picture of what happened the night she drowned. Since the only information Kingston had was the bare-bones story that her mother had told her, Kingston chose to speculate an interior life for her aunt. I call this technique “perhapsing.”

Using an Introduction

Your speculation can also come in the form of an introduction at the beginning of your story, such as in the case of Only a Few Bones by John Phillip Colletta. John lays out clearly to the reader that he is recreating the setting, that there are no fictional characters, and he depicts no action that is not suggested by documented circumstances. John goes on to state that he labels supposition. He also goes on to elaborate how he handles dialogue.

John states, “For family historians, therefore, this book represents a case study of how to build historical context around an ancestral event.

When we infer or speculate we do so from evidence; evidence that we have accumulated through our genealogical data and social history research. We must have sufficient enough historical knowledge to infer, knowledge that can be cited and sourced. We can then conclude or deduce a conclusion based on a premise and our accumulated facts. We can interpret the peoples and or their actions.  We can close in on those missing pieces and ultimately write a family history narrative that will satisfy the reader and that we trust is based on sound research, historical context and speculation.

Watch for part 2 in Writing a Family History When You Don’t Have All the Facts, as we delve into the study of social history research – the various topics we can research and where to find them.

 

Related Post

A Path to Mapping a Story SettingA Path to Mapping a Story Setting


In our last instalment of setting and social history, we talked about how setting can be a key component in our stories especially when we view it as a character in our family history stories.

Today, we will look at mapping our setting.  We will look at the purpose of a map as a tool in writing our family history stories. I’ll show you how I created my own setting map for guiding my writing. There are three features I like to keep in mind when creating my setting map; the main setting, beyond the central location and the activities and occupation that provide the movement throughout the setting. Let’s get started by looking at each one of these key elements.


Your Main Setting

In most cases, the primary setting of your story will take place in a city, town or village. However, your story could be on a ship or any other of many locations.  Regardless of where your setting is taking place, we need to include all the internal buildings and places within the setting. For example your ancestor’s home, his place of work, where he worships and where he gathers with other towns people to visit.


Beyond the Central Location

You’ll also want to consider what is beyond the central location. For example,  if your story takes places in a small town is it surrounded by lakes, forests, swamps or is it a city surrounded by industry or a ship surrounded by water.


Activities and Occupation

If your ancestor was a farmer, (we have a lot of those in our research), then details of how he performed his job and how he moved about in his day to day activities is very much a part of your story setting. Describing the physical characteristics of a farm, the land, the buildings and so on is one aspect of the setting. Explaining how to fix a broken wagon or harvest the crops in the field is also an element of your story setting.  How did your ancestor move about to school, church, and get the groceries? Where were these places located in relationship to your ancestor’s home?


The Purpose of a Setting Map

Creating setting map can be very helpful when writing your family history stories and dealing with the location and activities of your ancestor. They can aid your writing in many ways.

Maps can enable the tracking of your ancestor’s location throughout the story.                                      

As your ancestor moves about, from his job to home and church or the grocery store, it’s important to know where each of these locations is located in the story setting. Place them on your map as a visual tool.

Your map can help to reflect on your ancestor’s awareness of their surroundings.

As you move your ancestor through their activities, your map can help you develop an awareness of your ancestor’s surroundings.

A setting map can act as a tool for measuring your ancestor’s movement from point a to point b.

As you write your ancestor’s tale, he’ll have to move from one location to the next physically. Your map can help you with that. What’s the distance, does he walk, ride a horse, take a boat. This might lead to some further research to answer these questions.

A setting map can help you describe your ancestor’s journey and the world to your reader. 

Your setting map will allow you to consider what your ancestor is doing at the place he is on the map and what do the surroundings look like? How is he interacting with his surroundings? Whether it is a short journey to the neighbour’s house or a long journey across the ocean, a map can guide you through writing those details into your stories.

A setting map can help you to visualise the scene and the proximity of your ancestor to other characters and places.

With the movement of your ancestors, they will come in contact with other characters in the story and other locations. Your setting map will make it easier to know when they are within the proximity of greeting another character or hearing the church bells ring.


How to Create a Map

First, you have to take the time to get to know your story setting through research and then as you are discovering the setting or after you’ve completed your research you can create a map of the setting. I like to create the map while I’m researching.

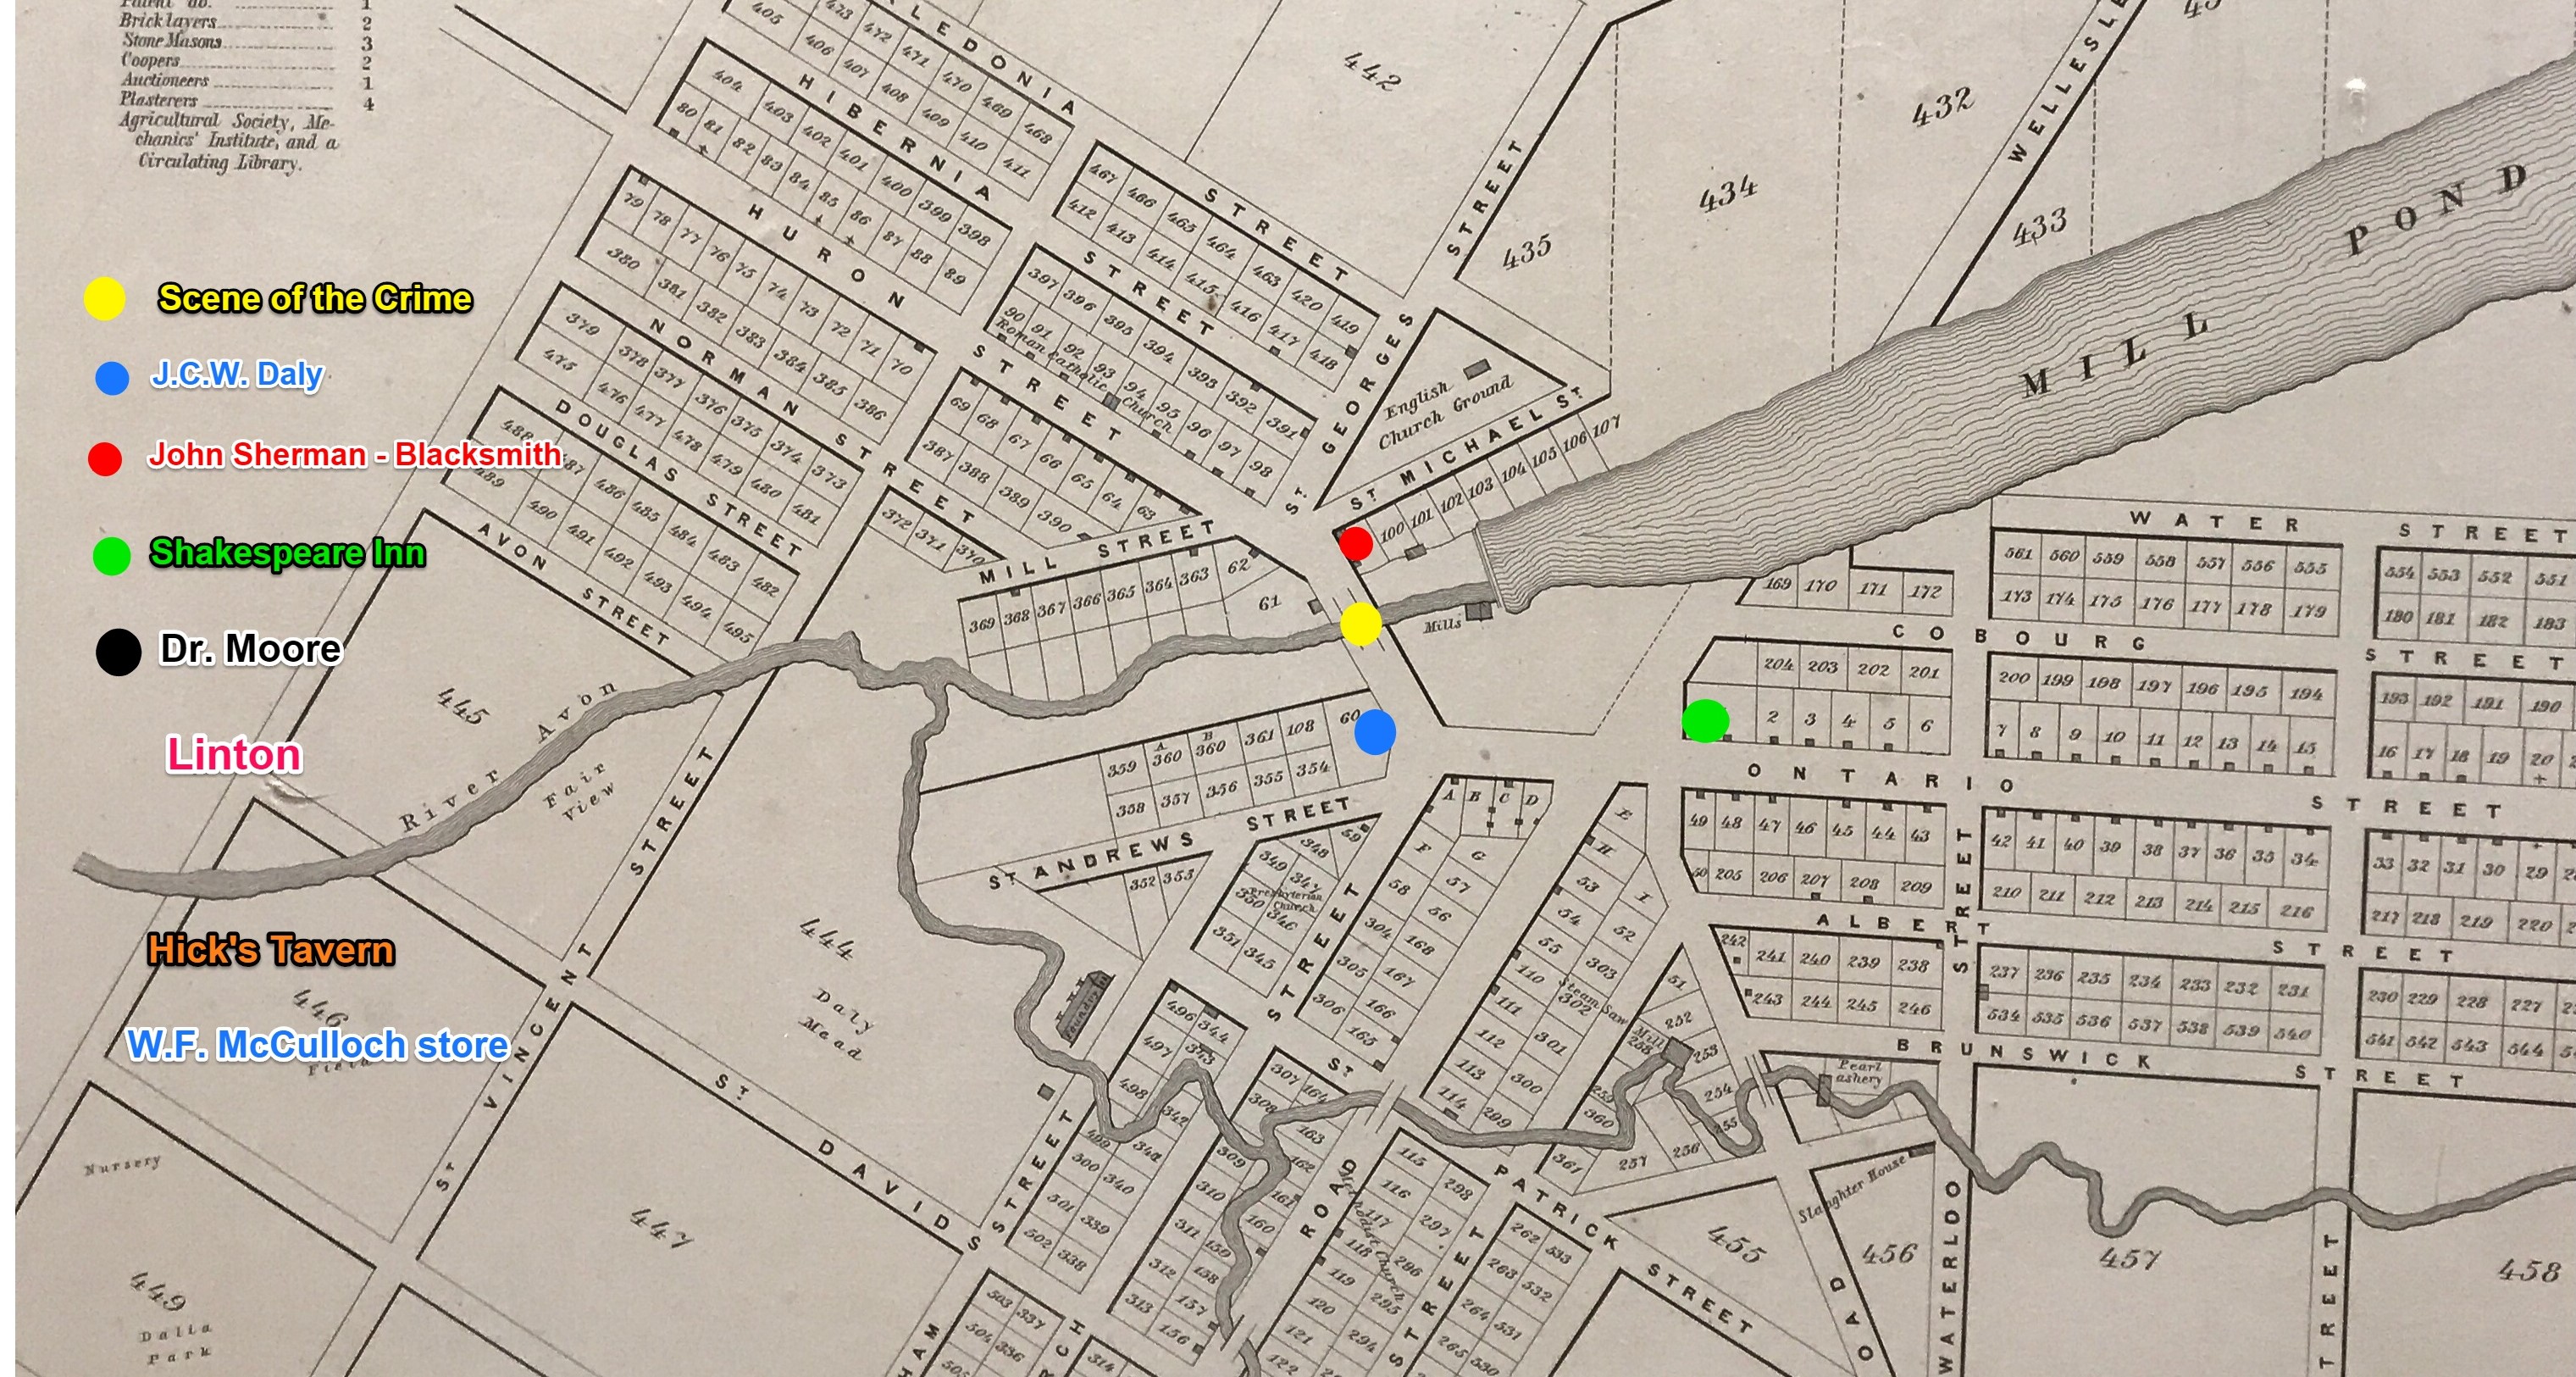
Here’s an example from my research. The town of Stratford is the setting for the story I’m currently investigating. It’s important for me to understand where some key places are located as my main character/ancestor makes his way about town.

As I went about doing my research this summer, I created a map.   I uncovered clues and mentions of various places that allowed me to put them on the map. Keep in mind my story is set in 1847, so I need to research and understand what Stratford looked like during this time.

The local museum had a map that is from the period of my story. They allowed me to take a digital picture of the map. I then uploaded the picture to Evernote. This is where it got fun.

This summer, as I worked through my setting and social history research each time I uncovered the location of an important place I marked it on the map. I did this right inside Evernote.  In Evernote, I used the annotate feature and created a key with coloured dots, so I have an easy reference to where various places are within the setting. Once I start to write, as I move my ancestor through the story, I can quickly reference where he is on the map and what the surroundings look like and how he might be interacting with those surroundings.


Also in this Evernote note, I created internal links to the information and pictures that I have for each location making it very easy to not only find the place on the map but to find my description notes within my research notebook.

Of course, this is only one of many ways to create a setting map. You certainly can sketch a map out if you like or use mind map programs, you are only limited by your imagination. Here’s an example of a setting map done with Prezi for The Great Gatsby.

Regardless of how you build your map or your map’s purpose, I hope you’ll consider including a map among your writing tools as a means to keeping your family history story on the right path.


8 Tips to a Social History Research Plan8 Tips to a Social History Research Plan


I’m getting ready to head to my ancestor’s town next week, but before I go, it’s important to have a research plan in place. Just as you would use a research plan for your genealogy research, you also want to identify a plan for the local and social history research you need to write your family history stories.

I’ve already plotted out my story. For those of you who haven’t taken our plotting course or read Finding the Story Workbook #3, this just means I have outlined my story from beginning to end in great detail. By taking the time to plan my story, it helps tremendously in identifying the local and social history research I need to complete my story.  Plotting your story in advance eliminates you from spending a lot of time researching topics that are not pertinent to your story. Your research will be more focused and purposeful.

Next,  I spent some time on the internet looking at the various resources available for my visit. I’ve identified some resources available including Perth OGS, Perth/Stratford Archives and The Stratford Museum operated by the Stratford Historical Society. There is also the Stratford Heritage Society which operates the Fryfogel Inn, and I’ve also identified some walking tours through the Stratford Tourism that I think might help me to put some context to the town and the community.  I won’t be able to cover all of these identified resources on one trip, so I’m creating a plan and a priority list as it’s probably going to take several visits to complete my research; all the more reason I need a plan. The plan might also need to be adjusted once scope out these locations when I arrive.

Here are eight steps I’ve identified in preparing for a research trip of local and social history research for your family history story.

1. Identify Topics That Need Researching

Start a comprehensive list of research topics. I like to keep this list easily accessible, you can keep it either in a notebook, or my preference is to use Scrivener or Evernote. Evernote being my first choice.


2. Identify Sub-topics

Some research topics may be pretty broad. Take the time to think of any offshoot topics. List them under original items.


3. Organise Your Topics

Not every research topic will be crucial to your story, some will carry more weight than others.  Reorganise your topics and subtopics by their level of importance. This way you will optimise your time on the more important issues. As well, some topics might be covered very quickly while others might take some time.


4. Have a Purpose for Each Research Topic

Each topic should be on your research list because they have the potential to add value to your story. Realise why you’ve chosen to include each subject in your research time. Don’t waste your time researching topics that don’t serve your story. This is why identifying your story plotline is important before you begin this research.


 5. Identify What You Want to Learn

List what you want to learn about each topic, so you have a clear goal in mind. When you have a goal, it becomes easy to identify when you’ve achieved your goal, and it’s time to move on to the next item on your list. Too often researchers have trouble finishing the research, never getting to the writing. Identify the end game so you know and when it’s time to move on. You also have to know when some research just may not be available. Don’t make your quest for local and social history research an excuse never to get to the writing.


6. Create a Story Box

Before I write a story, I create a Story Box. A story box is basically a container where I pull all my research for a particular story into one place.  I create a binder in Evernote for my Story Box. I add all the current documents and information into this binder. The Story Box makes it easy to find and quickly access anything you need about the story you are writing. Don’t spent valuable writing time looking for stuff. You can make a digital story box or tactile one, using an actual box. I like a digital box. I use Evernote because I’ll have everything I need wherever my research physically takes me. I can access it from my laptop, ipad or iphone and it’s cloud storage so there is no worry of losing it to a computer crash. Now as I begin my local and social history research anything I learn will also be included in my Evernote binder. In this Evernote Binder, I’ve also included my local and social history research checklist. If you don’t know how to make a research checklist in Evernote, you can check out my video below.


7. Create a Research Calendar

Once you’ve identified your research topics, you’ll want to consider how you are going to proceed with your research. The more organised and planned you are the more productive your research time will be. Schedule your research days on a calendar regardless of whether they are online or in an archive. How much time per day do you plan to spend doing this research? Set yourself a deadline to complete your research with realistic expectations. Without a deadline, you’ll research forever.

I’ve determined I’m starting with the Perth/Stratford Archives. I’ve sent off an email letter to them letting them know the day I am coming and what I will be looking for on that day.


8. Organise by Priority

My research plan is arranged by priority; what I feel is most relevant to the story –where I want to start.  My first focus will be on creating a map of Stratford in 1847 and locating the list of businesses and homes that I’ve identified. Hopefully, I will also come up with some general information, description or even a photograph for these places. This will help me to describe them in my story. I’m dealing with a very early time so photographs will be a long shot but some of the businesses may still have existed later, or an advertisement in a Gazetteer might exist to help get a perspective on the business.

I’m also going to start my research with the political climate in Stratford and Perth area at the time. It’s an essential element to my story. In my Google search, I’ve discovered that the Stratford Archives holds the council minutes for North Easthope (this is the township my ancestor lived in on the outskirts of Stratford). The council minutes begin in 1843 so I’m going to start there and well as many other resources that may help me with my list. You will also note that I’ve identified on my research checklist a list of books that may offer some insights into the local and social history of the time. I’ll keep an eye out for these in each archive I visit.

Keep in mind as you begin your research that your plan may change as more information and resources may open up to you and others may fall away because they just aren’t available. Remain flexible. However, a plan remains essential to identifying the research you need to help you bring that story to life on the page and keep you focused and on track.

Next: Reaching out to the Archives and the First Visit. 

Did you miss our first post in our series My Summer of Setting and Social History? World Building